How to create your first website
2021-12-30 19:47:33 +0000
Creating your first website is easy! Low-cost providers and software offers a simple way to get on the web.

Site building software like WordPress have greatly reduced the level of effort required to create an online presence. I've been making websites for over 20 years and when people ask me today, I send them to WordPress. It's cheap and easy, and with hundreds of customizable themes available, it works for nearly any use case. The simplicity makes it well worth the cost of a "Venti Non-fat Double-shot Caramel Macchiato."
What about "static" websites? Sure, of course, static websites may be faster and cheaper once "built" and "deployed," but ask yourself, "Do I want the added effort and want to learn to code, just to write a post?" I highly recommend challenging yourself to learn new skills, but the fact is, for most people, WordPress is excellent.
A website really needs 3 things:
- Hosting Provider (WordPress, Dreamhost, Medium, etc.)
- Content (This one is up to you.)
- Domain Name (The important branding step.)
1. Hosting Provider
For the purposes of this comparison, I focus on hosted WordPress.
WordPress.com
Complexity: Low
Price: ~$4/mo per website. ($8/mo if you want revenue.)
Speed: Good - Pages load quickly.
Management Overhead: Low.
Custom Email: Available.
Link: WordPress.com
Shared Hosting
Complexity: Medium-High
Price: ~$3/mo for 1 or more websites. (Wordpress is typically a free install.)
Speed: OK - Good enough for most sites.
Management Overhead: Low-Medium
Custom Email: Available
Examples: DreamHost, BlueHost, GoDaddy
2. Content
There's no shortcut here. Providing decent content is 97.6% of the effort behind maintaining an online presence. Notice how this is the shortest section? Good Luck!
3. Domain Name
Domain names are the original "online real-estate." Some names trade hands for millions of dollars and most "useful" names are now available only through auction or for sale by owner. Selecting a domain name for a website is an important piece of any branding exercise and the price to usefulness ratio should be carefully weighed when starting out. If you end up making millions of dollars per year (or month), go ahead and spurge. But, while you're just getting off the ground, maybe take it easy. Remember that you can pay for a .io domain (about $35/year) for over 10 years before a $350 .com domain breaks even.
Due to the shift in domain real-estate over the last 10 years, there's arguably no difference in search engine priority (SEO) between any of the available top-level domains (TLDs).
When you're ready to buy, remember that your domain name is the foundation of your online presence and should be purchased at a reputable registrar. Be sure to enable two-factor authentication at your registrar AND use a unique and strong password to secure your digital assets.
For simplicity and security, I recommend Google Domains. If you're looking for something less "Big Tech-y," consider Namecheap or Uniregistry (now owned by GoDaddy.)
Some hosting providers provide built-in support for purchasing and managing domain names. This may be a great way to reduce the complexity of your setup, and speed through to the finish line.
Conclusion
The hard part is content really. Keep an eye on which providers have the best documentation to help guide you through their individual administrative and management tools. The setup guides should also clearly define how to point your custom domain at your new website with relative ease.
Want more more Nuggets?
Liked what you saw here? Checkout Nate’s other ramblings at nsviews.com.
How to switch from 1Password to iCloud Keychain
2021-12-30 01:01:42 +0000
I've been a 1Password (1P) user since 2008. I have nearly 900 logins, passwords, and other secure iteams in 1P. I've trusted 1P since 2008 because the app used essentially the same Mac OS X (as it was then known) Keychain but allowed for greater functionality and web browser autofill. I thought I'd give Apple's new cross-platform, macOS-level password manager a try. Here are the steps I used to migrate all of my passwords from 1P to Apple's. Please remember to back up your passwords securely. That's out of scope for this write up, but please backup before trying anything new.

At a high level, you'll export a CSV (Comma Separate Values) file from 1Password and import that same file into macOS Password Manager.

Export CSV from 1Password
Open 1Password on your Mac.
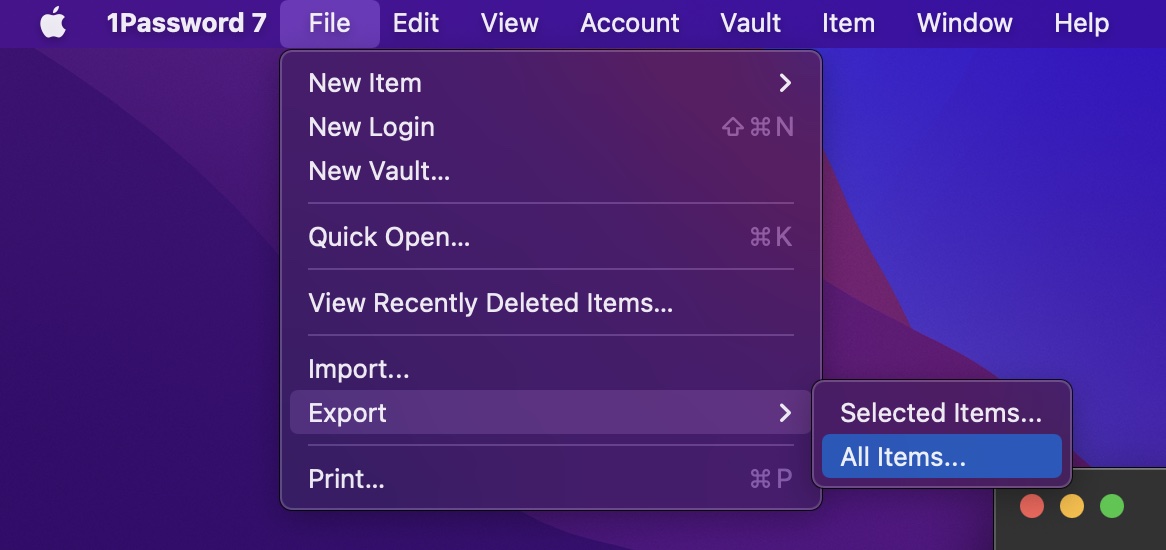
Select File > Export > All Items...
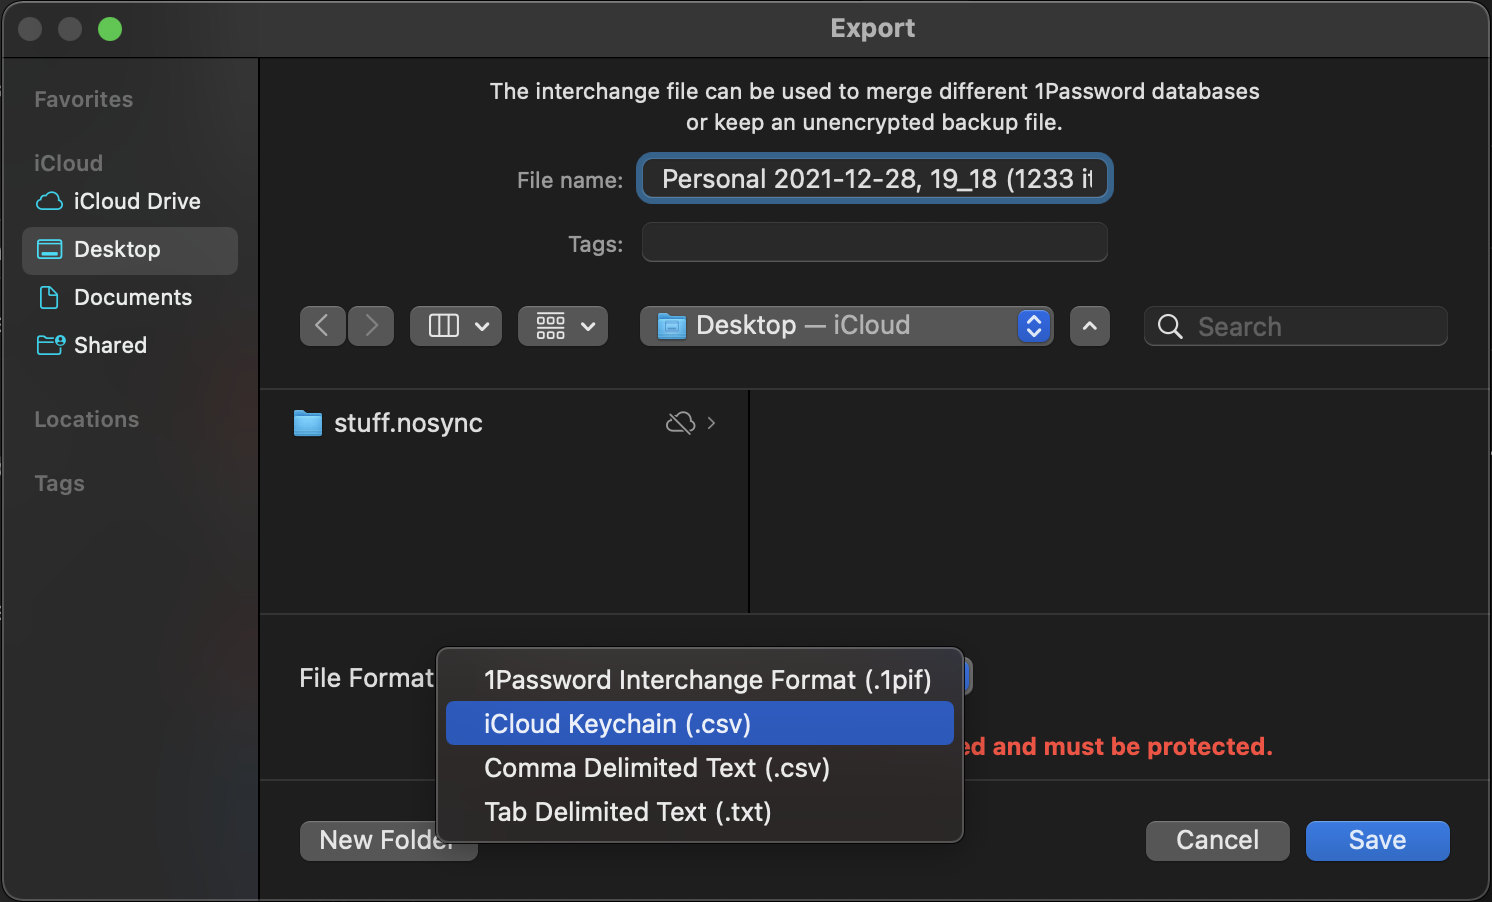
In the Export window, select File Format: iCloud Keychain (.csv)
Name it and save the file.
Important: Pay close attention to this file and keep it safe. YOUR PASSWORDS ARE NOT ENCRYPTED AND ARE STORED AS CLEAR TEXT AT THIS POINT.
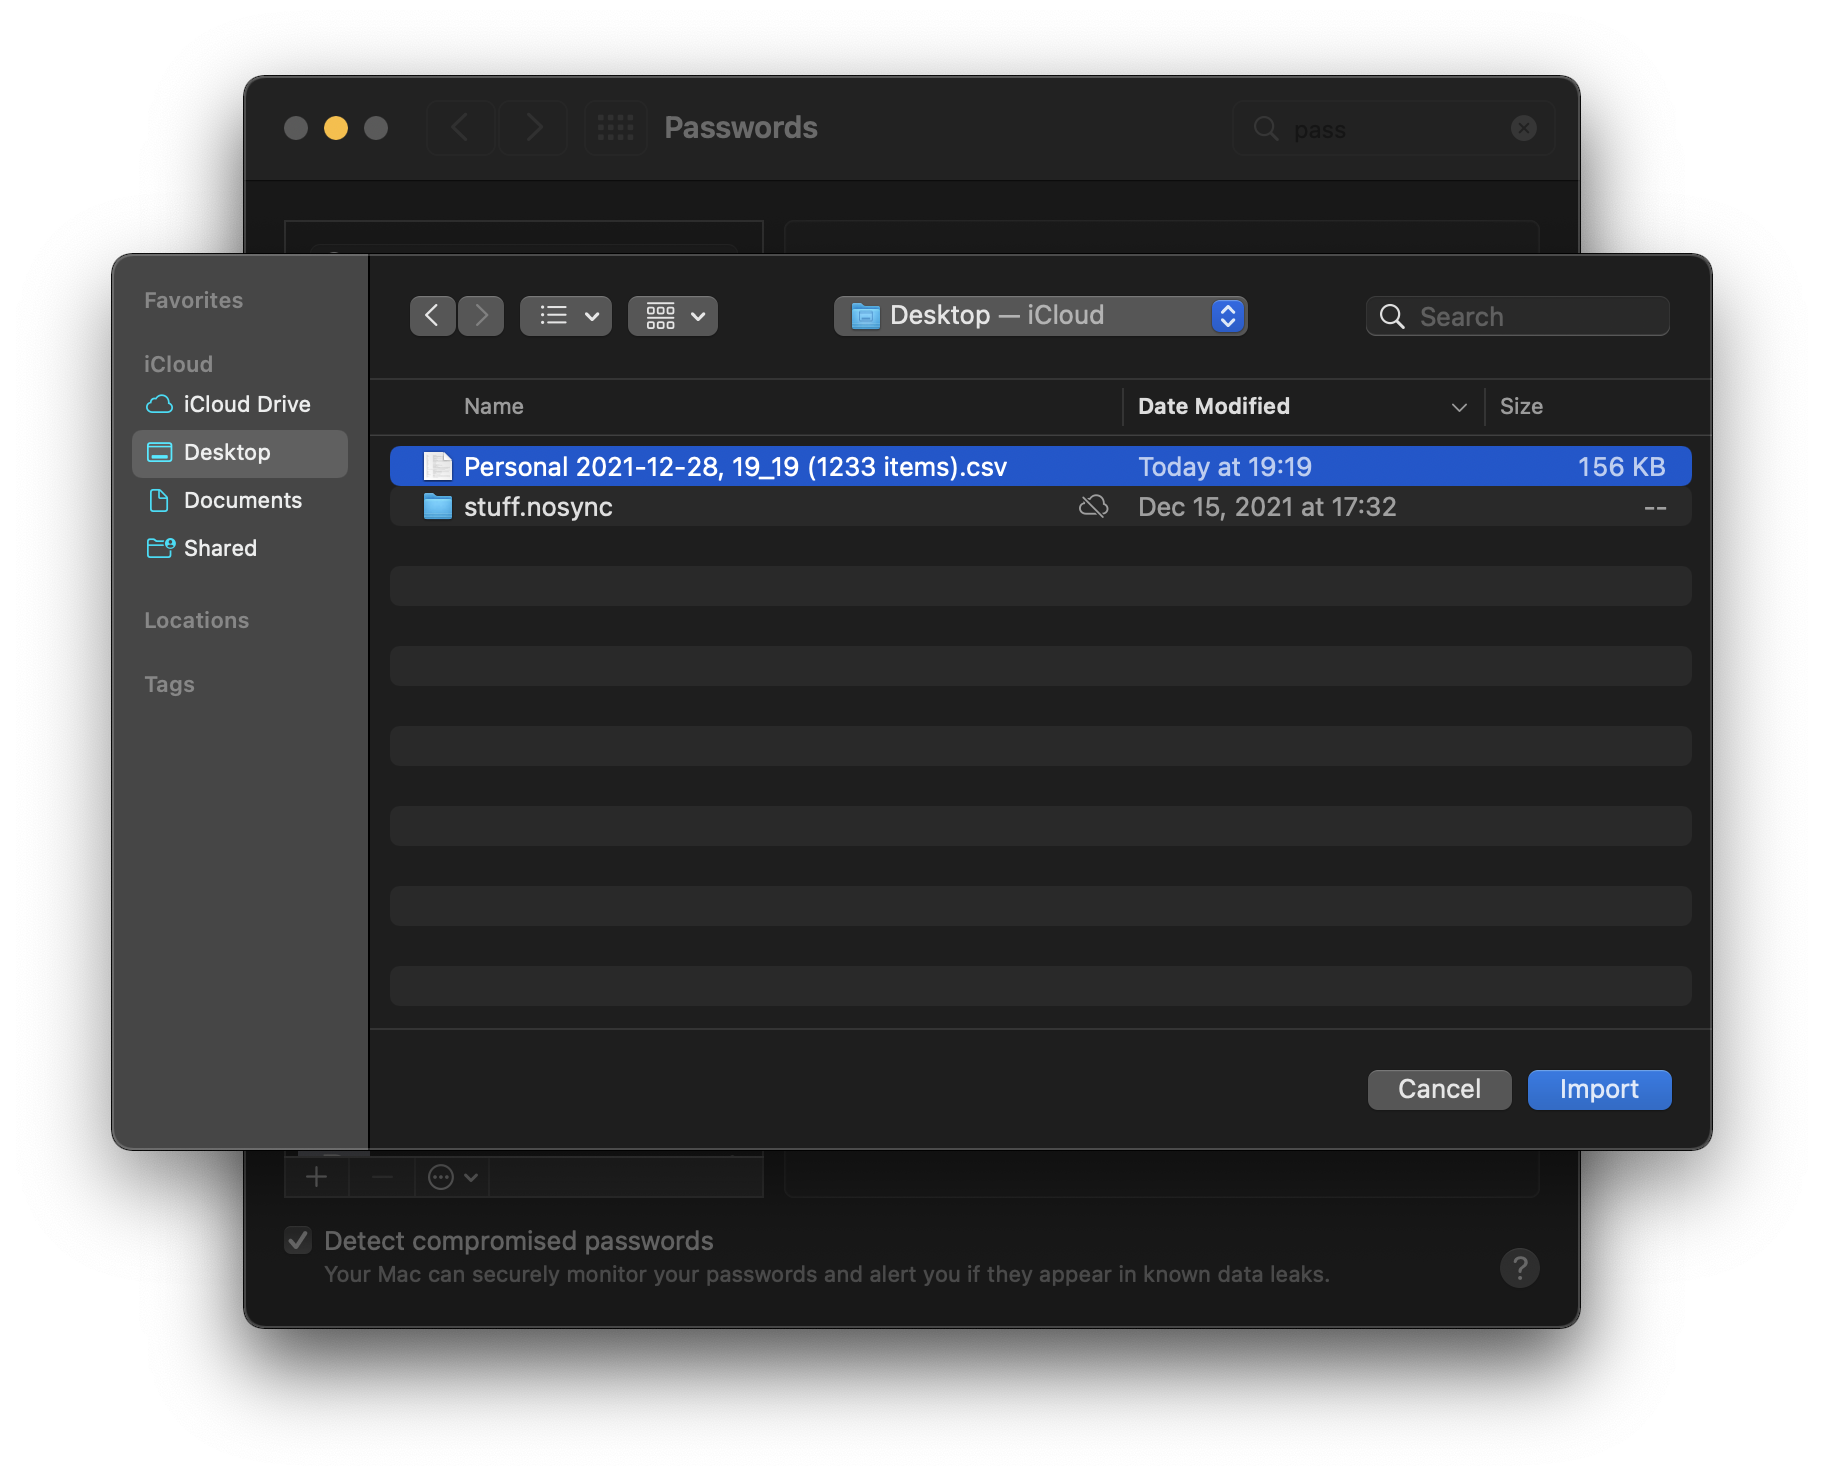
Take careful note of where you save this file. Notice I use iCloud Desktop and Documents... this will save my password in clear text in iCloud. While not a question of whether iCloud is secure, there's no need for clear text passwords to leave my Macbook. Ever.
I recommend saving locally, or creating a new folder with ".nosync" suffix that will prevent iCloud from syncing the folder.
Import into "Passwords" (iCloud Keychain)
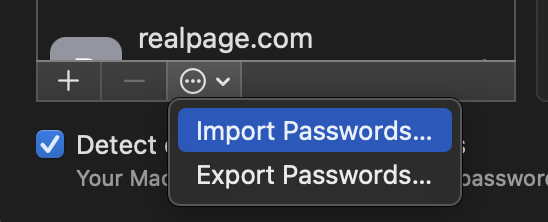
Open System Preferences and select Passwords.
Here, you'll be able to select "Import Passwords..." from the list view overflow menu.
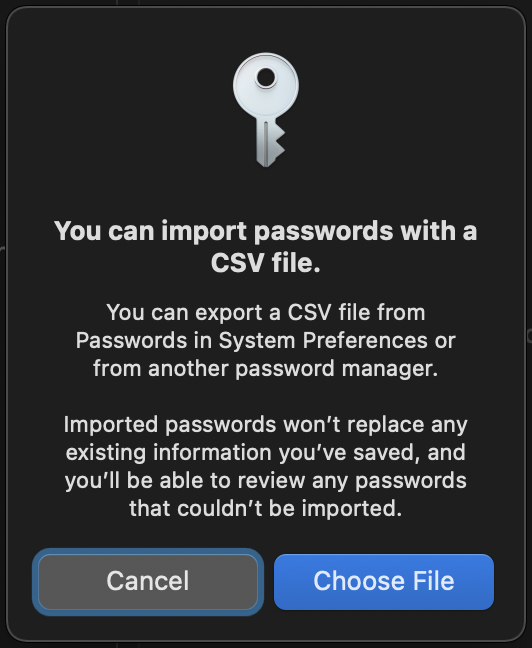
Select Choose File.
Navigate to the location you saved your exported CSV file and select Import.
Again, please pay special attention to where you saved this file. DO NOT keep this file as is. All of your passwords are stored in plain/clear text at this point. You should delete this file immediately after import is complete.
Clean Up
That's it! At this point, all of your stored logins should be available in iCloud Keychain across all your devices.
Remember to delete any CSV or other format that stores passwords as clear text. This includes .1pif, .json, etc.
I also highly recommend backing up your passwords using an encrypted Disk Image and storing on a Flash Drive. NEVER store your passwords in clear/plain text.
More Useful Nuggets
Liked what you saw here? Checkout Nate’s other ramblings at nsviews.com.
Useful FFmpeg commands
2021-12-05 23:31:59 +0000
I find myself reusing a handful of FFmpeg commands. Here's what I use most often.
Extract LPCM Audio Track
Extracts an audio track from a fully muxed input file.
ffmpeg -i stream_file.m2ts -map 0:a:0 audio.wavExtract a Video Track
Extracts a video track from a muxed input file.
ffmpeg -i stream_file.m2ts -c copy -an vid_only.mp4Clear DNS Cache on macOS/Safari
2021-12-05 23:27:09 +0000
sudo killall -HUP mDNSResponderSometimes you just have to flush your cache.
Docker for Mac - Default Docker Engine Config
2021-12-05 22:36:40 +0000
This is the default Docker Enginer configuration JSON. I once needed to revert and had a difficult time locating this without resetting my whole installation.
{
  "builder": {
    "gc": {
      "defaultKeepStorage": "20GB",
      "enabled": true
    }
  },
  "features": {
    "buildkit": true
  },
  "experimental": false
}
Install Docker for Mac
Follow instructions on the install page.
Install Docker for Windows
Follow instructions on the Windows install page.
Free iPhone feature untethers your life
2021-12-05 20:18:17 +0000
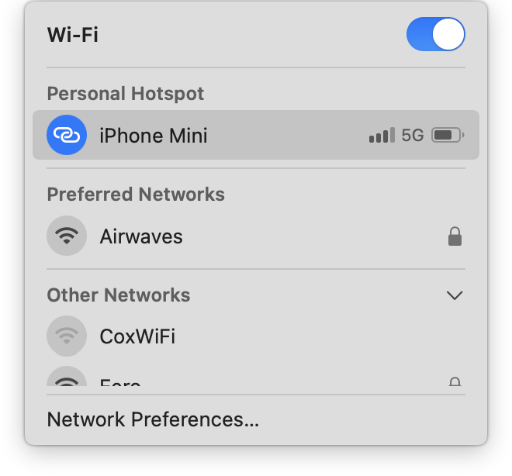
Your iPhone has a built-in wi-fi access point that allows you to connect your laptop, iPad, or other wi-fi devices to the Internet using your 5G or LTE connection. Most mobile carriers include some amount of hotspot data in their data plans.
See for yourself how simple it is to use.
Enable Personal Hotspot in Settings
First, make sure the Personal Hotspot feature is enabled. If your mobile carrier allows the hotspot feature, it will automatically appear in your Settings list beneath "Cellular" option.
While most carriers allow some amount of Hotspot data today, you'll need to ask your mobile carrier about enabling the hotspot feature if you don't see the option in Settings.
"Allow Others to Join"
The most common way to connect to a Wi-Fi hotspot is with a password. You'll find a randomly generated, unique password by default. You're free to edit this as you please. To protect your mobile data, I recommend using the random password or other strong password.
As of iOS 15, the Personal Hotspot feature secures wi-fi traffic using the latest WPA3 standard. The feature is also backward compatible with WPA2 devices.
Connecting from your laptop
If your laptop and phone are both signed in to the same iCloud account, this process is mostly automagically handled for you. However, if you keep personal and work computers, you may have to type the password manually. Remember your hotspot password can be found on the Personal Hotspot options screen in Settings.
More Useful Nuggets
Checkout Nate's other ramblings at nsviews.com.
Why do I need two-factor authentication?
2021-11-28 14:45:50 +0000
Today's Internet is not the same playground many of us grew to love. Instead, the Internet services are deeply integrated into our daily routine where most of us have come to expect many "tier-1" services to be at our beck and call 24 hours a day. With so much of our lives now online, that playground gives ample opportunity for scammers to make a buck off some unsuspecting individuals.
This modern dependence on Internet services reveals the problem that many identity systems and associated infrastructure have not yet caught up to the criticality of the services and functionality they're used to protect. The old email address and pass phrase is too cumbersome for most, and too simple to extract either from the individual (phishing) or service provider (data breach).
What can I do?
Most websites today offer some form of two-factor or at least two-step sign-in. Use it! Providers implement this feature for your protection.
Stay alert and ask yourself a few questions:
- Do I really need to give this website my email address?
- Why am I being asked to sign-in?
- If clicking a link, do you know who sent you this link?
Creating an account with a website often makes sense if you plan to place an order or plan to visit repeatedly. Just keep in mind that you're likely signing yourself up for marketing emails and providing your personal information to a service provider. Online accounts are protected by various authentication techniques. It's likely that you'll be asked to provide your email and create a unique password in order to create an account with a provider.
Why Authenticate?
Simplest answer? Authentication allows us to delegate our online identity to others who are quite good at managing them for us.
E-mail is a great example of delegation. While email itself is open and designed to be distributed, it’s often impractical for all of us to run our own email server in our home. Consider receiving a paper letter at your home. You retrieve this letter at your convenience, but it was delivered by a postal worker who left it in your mailbox that exists indefinitely in physical space. If maintaining a physical mailbox at your home is unpractical, you have the option to rent a mailbox at a post office. A P.O. Box is a delegated mailbox because you allow someone else to accept your letters. You can then retrieve letters from the mailbox with a physical key, provided by the Post Office at time of rental.
In order to receive a letter in “online” space, you must also maintain a mailbox, just like the physical mailbox. Receiving email requires a computer to be “online” and available every day in order to receive a message. To receive that message in a timely manner, that computer must be listening 24 hours a day for new mail.
For reasons ranging from technical effort to cost of electricity, most of us delegate the maintenance of our virtual mailboxes to a mailbox-provider like Google or Microsoft. In order to restrict access to a delegated mailbox, we must be able to prove to our mailbox provider that we should be allowed to view the messages in the mailbox. Authentication is the digital replacement for the physical mailbox key.
What is Authentication?
I refer to Authentication here as any workflow where one party makes an identity claim to another party, and then proves they are who they say they are.
Traditionally, most websites and Internet services have relied on a username as an identity claim, and password or shared secret to prove that identity claim. In the last decade or so, email addresses have become the standard replacement for username mostly because they’re easy for users to remember, and guaranteed to be unique. (Only one user can sign up per email address.)
This traditional email/password combination serves as the most basic identification challenge. The purpose of adding a second step to this authentication workflow is to supplement something you know with something you have.
For example, a thief may know the exact make and model of your car, but they don’t physically possess the key. Therefore, they cannot steal your car. If that same thief were to steal your car key, but your car required a pass phrase in addition to physical key, your car would remain safe. The same is true when accessing your email online. You must enter your secret pass phrase (something you know), and prove that you’re in possession of some physical key (something you have). This is the general design concept behind two-factor authentication.
Why do I have to enter a 6-digit code?
Many of today’s online services have elected to implement a second factor of identification through a mobile phone via SMS. The purpose of the 6-digit code is to confirm the "something you have," your phone. While this provides a two-factor solution to nearly 100% of today's users, it relies on a decades old transport layer that was never intended to be secure (sms). SMS is not necessarily insecure, but there are still ways to hijack or steal your phone number and therefore your SMS codes. For this reason, your mobile phone carrier must be trustworthy and also enforce two-factor authentication.
While there are many reasons why two-factor over SMS is not ideal, it does greatly improve the user’s security and provider’s confidence that it is, in fact, that user signing in.
Sites and Services that offer two-factor
Check out the 2fa directory maintained by 2factorauth.
Add two-factor to your site using trusted identity platforms
Why I trust Big Tech companies
2021-11-27 14:44:48 +0000
Big Tech has a bad rep but facts don’t lie
The fact is, big tech companies are pretty good at securing and protecting the identity of their users.
For the purposes of this discussion, we’ll set aside advertising. (Even advertising is not revealing your individual identity—most of the time.) Big tech companies have both resources and internal data handling guidelines for user data. Smaller startups or websites are simply less likely to have the same rules and access controls in place. There are trustworthy experts watching after services 24 hours a day. You just have to know where to start, and who to trust. Big Tech has been under the microscope for years, and, for legal reasons, maintain internal restrictions and safeguards against wrongful access of user data. This includes protection against data breaches.
So when I’m looking for online identity delegation, I trust the big tech companies because they have the most to lose of my identifying data gets out.
You can do some basic research yourself over at haveibeenpwned.com. Enter your email and see what happens next.
Can I trust the Internet?
2021-11-26 14:44:17 +0000
Well that's a loaded question. I would answer, "maybe?"
It's easy to let seemingly insignificant details fade into the background of our Internet-connected lives. But those pesky details determine whether your holiday gifts arrive safely, or if you've just given a nice holiday "bonus" to some scam artist anywhere in the world.
At a high level, the Internet, just like anything else, is essentially a Client (you) / Service (them) model. Clients request content from a Service provider which can be anything or anyone. All Client/Service models require some level of Trust. You trust your bank to keep you money safe, rather than store it under your mattress (hopefully).
Everything we do as humans revolves around trust, and the Internet is no different. We trust ourselves because we can see and feel our own experiences. We know what our own experiences teach us because we experienced them first-hand. We often trust those closest to us, because we have established histories with them. Trust in this case is often around protecting our fundamental human needs. Needs that range from food, water, and shelter, to possible financial support at times. Familial trust often starts a birth (or other young age) and is built over time. Friendships bring a second source of trust, but also take time to build. The same concepts apply in the virtual world. The longer we maintain an account with an online service provider, we grow more comfortable with using the service.
Just keep an eye on who or what provider which services you use. And be aware of what their expectations are in return. Just remember, all web services cost money to maintain. Ask yourself, what's the provider getting from me if not a membership fee?